Cookery [kook-uh-ree] - the art or practice of cooking; a place equipped for cooking.

Sunday, March 22, 2015

Crispy Oven Roasted Chickpeas

I actually made this a couple weeks ago, but have been super busy wedding dress shopping and St. Patty's Day partying. :P I had a bunch of chickpeas (made from dry) that I needed to use fast, since they're only good a few days after you cook them. And I found a snack recipe for them! They turned out great. I actually took them on a Color "Run" 5k that my friend and I did, and these were a good pre-run snack while we were waiting for the run to start.

Original recipe here


Servings: 10
About 172 calories per serving  (~100g per serving)

Ingredients:
5 cups garbanzo beans/chick peas (canned or cooked from dry)
3 tbps olive oil
2 tsp garam masala
2 tsp salt
2 tsp cayenne pepper

Step 1: Drain and rinse chickpeas, if not already done. Lay out on paper towel to dry.
Step 2: Preheat the oven 400°F.
Step 3: Combine olive oil, cayenne pepper, garam masala, and salt in a bowl.
Step 4: Place chickpeas in a medium to large bowl.  Pour the spice mixture over the chickpeas and toss until coated.
Step 5: Spread chickpeas on a baking sheet (I lined mine with aluminum foil). Make sure they're not too tightly packed.*
Step 6: Bake for 35 to 45 minutes.  Carefully shake the tray a couple times between cooking.**
Step 7: Remove from oven. Serve hot or room temperature.

*I had to use two baking sheets to have them spread out. If you have too many on one sheet, they take longer to get crispy.
**I shook tray at 15 minutes in and 30 minutes in.

Recipe's time estimate: not listed
My total cooking time: 50 minutes (5 minute prep, 45 minutes cook)

As you can see, this recipe is SUPER easy. And so yummy. I ate a whole serving right when they came out out the oven. Sooooooooooooo good. They're still good after they've cooled, and even after a couple days (stored in ziploc bags), but they're the best right out of the oven.

Ingredients

Step 3

Step 5 - This tray took a little longer to get the peas crispy


Saturday, March 7, 2015

Baked Nian Gao with Coconut Milk

Chinese New Year just passed. And I was sad to miss my family party AND new year's cake! So I decided to make my own! A couple years ago I made a Baked Nian Gao cake, and although I liked it, it wasn't too popular. So I hunted down a different recipe. And this one turned out sooooooooooo GOOD! Rather addicting. One of my favorite recipes now!

Original recipe here


Servings: 24
About 181 calories per serving

Ingredients:
3 cups of glutinous rice flour
1 cup canned coconut milk
2 cups water
2 cups sugar
1/4 cup butter, melted
4 eggs
2 tsp salt

Step 1: Line a 8 x 8 inch square tin with parchment paper.
Step 2: Pre-heat oven to 350F.
Step 3: Mix butter, coconut milk, sugar, salt and water in large bowl, until sugar is dissolved.
Step 4: Add eggs. Mix well.
Step 5: Add glutinous rice flour. Stir until well combined.
Step 6: Strain mixture into baking tin (I used a mesh rinse/drain bowl, like that used for washing veggies or draining pasta).
Step 7: Bake in the oven 45-90 minutes or until the cake is set. Cool completely for at least one hour before transfer out for cutting into desired size.*

Recipe's time estimate: not listed
My total cooking time: 2 hours (30 minute prep, 1 hour 30 minutes cook)
Does not include cooling time or overnight setting.

*I waited at least two hours before cutting, the cake was still pretty warm despite being on a cooling rack. And the cake was still pretty gooey. It tasted good, but the consistency was off a little. However, after the leftovers sat overnight, the consistency was PERFECT (a little more solid). So it would be best to make this the day before OR at least several hours before serving.

Also, the original recipe cook time was 30-45 minutes. When I checked the cake at 45 minutes, it was still pretty liquidy and not set. I kept adding 10-15 minutes to the cooking time. I probably left it in longer than I had to, but I wanted to be sure it was fully cooked, and the top wasn't burning so I felt it was safe to leave in longer. I ended up leaving it in for almost 1.5 hours.

I took the leftovers to work the next day, and everyone loved it. Many asked for seconds!! And it took all my will power to hand it all away so I wouldn't sit there and snack on it. So I will definitely be making this again. But I might use a larger baking tin or maybe try a higher cooking temp, to try and speed up the cook time.

Ingredients

Step 1

Step 4 

Step 5

Step 7 - completed cake before cutting

Monday, March 2, 2015

Slow-Cooker Barley and Chickpea Risotto

I've been eating pretty badly after I get home from work...either because I snack on random stuff, or each too much pizza during MTG night...or because I don't feel like cooking. So I wanted to pick something easy that was healthy....AND I wanted to use barley, because I'd just read an article saying barley was a good add-in for healthy eating. So I found the this recipe on Pinterest and it sounded pretty simple. That's what I based my attempt on (I changed some things slightly and doubled it up since I have a large slow-cooker).

My mistake....trying to start with dried chickpeas...without looking up/remembering that not only do they need to be soaked overnight (which I did), they need to be cooked in a pot of water for an hour and a half (which I didn't). So that was stressful, there I was in the middle of preparing all this stuff to toss into the slow-cooker and....I had no chickpeas.....Go me.

BUT...I ran to the store and grabbed some canned chickpeas really quickly, and finished setting up the slow-cooker. The rest of the prep was pretty easy. AND IT WAS GOOD.


Servings: 10
About 291 calories per serving

Ingredients:
3 tbsp olive oil
30 baby carrots, chopped
3 tsp garlic powder
1 head cauliflower, cut into small florets
1 yellow onion, minced/chopped
3 tsp dried thyme
2 1/2 cups pearl barley, rinsed
2 cans (15.5 ounces) garbanzo beans (chickpeas), rinsed and drained
5 cups beef broth (prepared from beef Bouillon)*
2 1/2 cups water
1 tsp salt
1 tsp ground black pepper
3 tbsp lemon juice
2/3 cup grated Parmesan cheese

*can opt for vegetable or chicken broth, per original recipe

Step 1: Heat oil in large skillet or saucepan over medium-high heat. Add carrots, garlic, cauliflower and onion. Cook until veggies begin to soften (about 5-8 minutes), stirring occasionally.
Step 2: Stir in thyme and barley; cook 2-4 minutes, stirring frequently.
Step 3: Transfer mixture to slow-cooker. Stir in garbanzo beans (chickpeas), broth, water, salt and pepper. Cook on high about 2-1/2 hours or until barley is tender and most liquid is absorbed.
Step 4: Stir in lemon juice.
Step 5: Serve; top with parmesan, if desired.

Recipe's time estimate: not listed
My total cooking time: 3.5 hours (45 minute prep*, 2 hour 45 minutes cook)

*My prep time is exceedingly long because I kept running around trying to figure out the garbanzo beans/chick peas. My estimation is that regular prep should take no longer than 20-30 minutes. And most of the cook time is just letting it sit in the slow cooker!

I'll definitely be making this again. I had a ton of left overs, and it reheats REALLY well. I even mixed in some crushed red pepper to give it a little kick, and that worked out great! Super easy (minus the chickpea fiasco) and some down time do work out or clean or whatever floats your boat! This recipe actually work perfectly for me, since I usually get home from work around 3-4, so even if I need to prep everything right then, dinner would still be done around 6-7. And since this is a one-pot meal (it's got veggies, protein, and carbs), you really don't HAVE to serve it with anything else....just eat more of it. ^^

Ingredients

Prepped carrots & onions (used Pampered Chef food chopper)

Rinsed Barley

Step 3 (Everything mixed in the CrockPot!)

Step 5 (already topped with Parmesan)

Saturday, February 21, 2015

Andes Mint Chocolate Chip Cookies

This one is based off a recipe found on the Andes Creme de Menthe Baking Chips bag. I didn't follow it exactly, since I wanted to make a larger batch for a party but didn't have a second bag of those particular baking chips. So I modified the recipe a bit, but they still turned out delicious! Too bad I typically only see those Andes baking chips around during the Christmas holidays....but maybe that's a good thing, or else I'd be making way more cookies than I should...


Servings: 68
About 121 calories per serving

Note: This make a very large batch. It can definitely be halved or quartered for smaller batches.

Ingredients:
1 cup unsalted butter, softened
1 1/2 cup brown sugar
1 cup white granulated sugar
2 tsp baking soda
2 tsp baking powder
1 tsp salt
4 eggs
4 tsp vanilla extract
1 pkg Andes Creme de Menthe Baking chips (10 oz)
1 cup (6 oz) Nestle Semi-Sweet Baking chips
4 1/2 cup all-purpose flour

Step 1: Preheat oven to 350F.
Step 2: Beat butter, brown sugar, white sugar, vanilla, and eggs until mixed.
Step 3: Mix in baking soda, baking powder, and salt (mix well).
Step 4: Mix in flour (mix well).
Step 5: Add Andes and Semi-sweet baking chips, stir.
Step 6: On lined or non-stick baking pan, drop heaping tbsp of dough.
Step 7: Bake for 14-20 minutes (will depend on whether you are baking more than one pan at a time). If baking two pans at a time and on different racks, rotate pans halfway through cooking time (they will also need a few extra minutes). I did two racks at a time and each batch required 18-19 minutes.
Step 8: Cool (or eat some hot like I did!).

Recipe's time estimate: not listed
My total cooking time: 59 minutes (20 minute prep, 39 minutes cook)

A lot of my prep time was mixing the batter. I don't have a stand mixer, and mixing large amounts of dough by hand takes a while to ensure thorough mixing. So if you make a smaller batch or have a stand mixer, your times will be shorter. These were a hit at our game night party. I think using partially semi-sweet chocolate chips helped keep the cookies from being over-poweringly sweet. I'll make these again, but will try and play with the ingredients to maybe cut down on the calories.

Ingredients

Step 2

Step 5

Step 6

Sunday, February 15, 2015

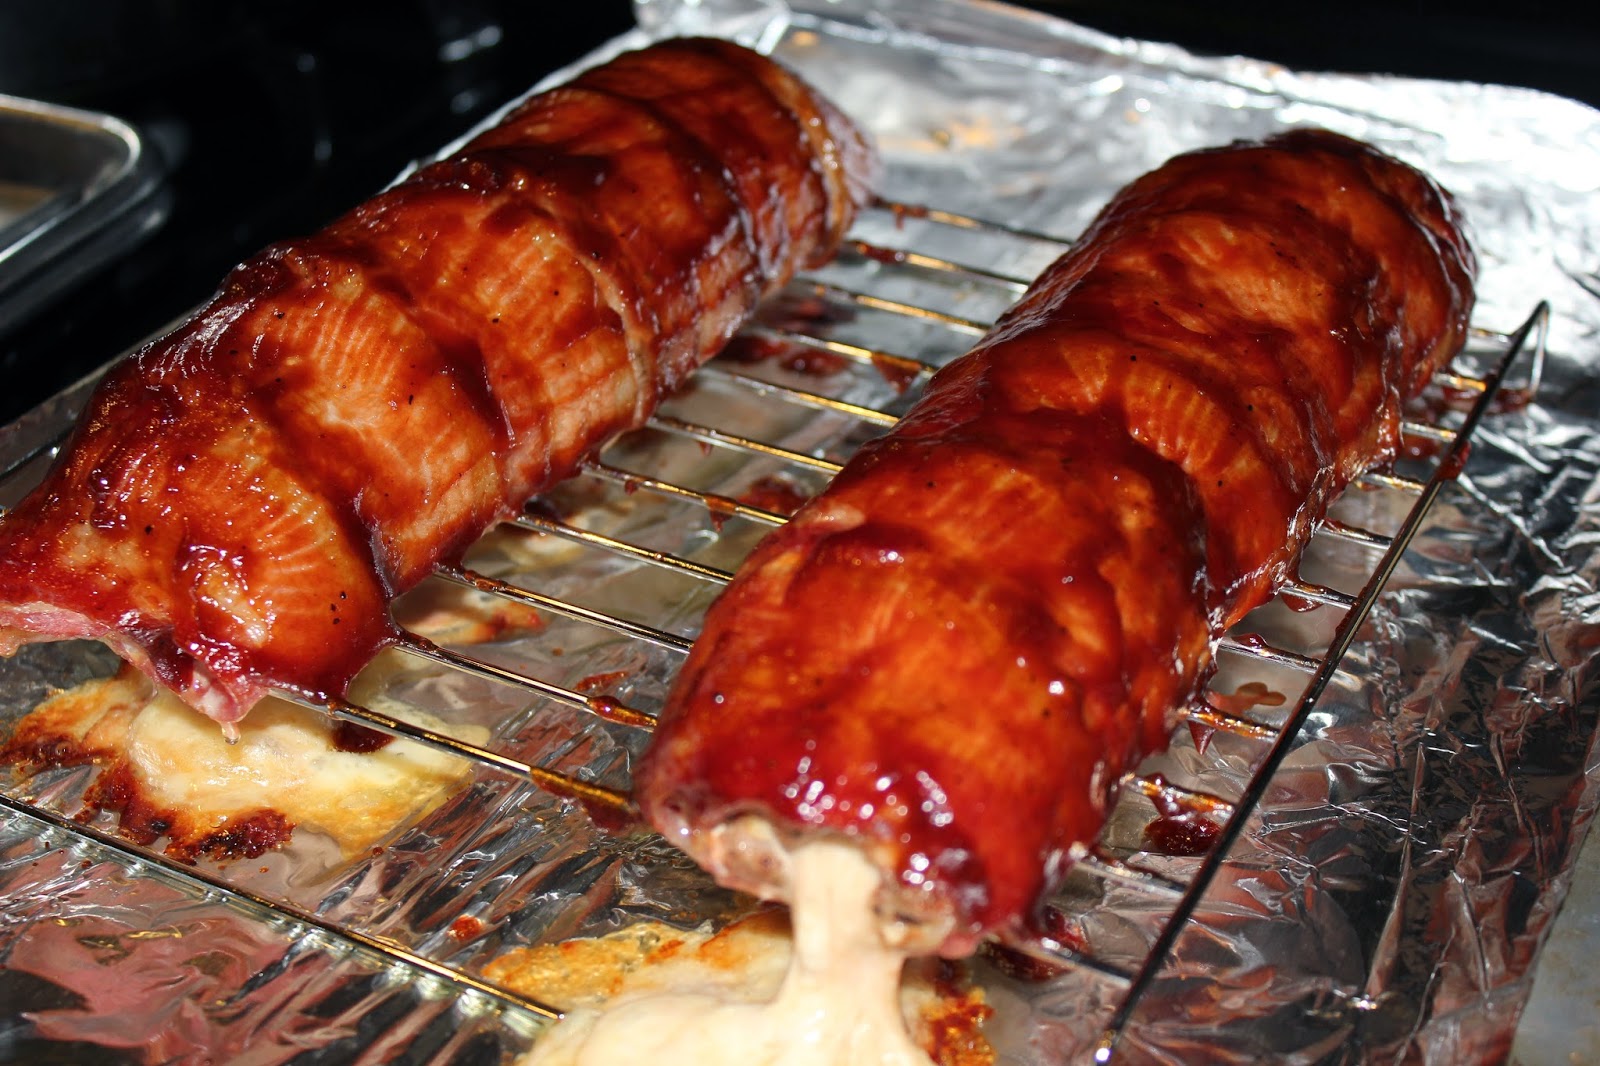
BBQ Bacon Sushi

Yes...the name is a little....odd. And maybe off-putting to some. But I LOVE bacon and was intrigued. I actually found this through some Facebook page, and was excited by how easy the recipe looked. And what better time to try it than Valentine's Day, for my sweetie that loves all things meat? I used ground lean turkey, since that's what I have on-hand, instead of beef like the recipe called for. I also used my oven on "bake" setting, because I didn't feel like using our outdoor BBQ grill. The original recipe (actually a YouTube video) can be found here. This turned out OK, and it was actually really easy to make. I think I just need to fine-tune the ground meat seasoning, as it was a little bland this first attempt.


Servings: 16
About 141 calories per serving

Ingredients:
12 Slices of Bacon
1.5 lbs Ground Turkey (24 oz)
BBQ Rub or seasoning of your choice
4-5 oz cheese
2/3 cup BBQ sauce

Step 1: Preheat oven to 375 degrees.
Step 2: Prep grilling rack (I used a small grill rack in a lined baking tray).
Step 3: Prep ground meat, mixing with desired seasoning.
Step 4: On wax paper, lay out 6 slices of bacon side-by-side.
Step 5: Spread half of the ground meet on top of the bacon in a thin layer.
Step 6: Put half of the cheese (cut into sticks or strips) along one side of the meat (at one of the edges with the bacon ends).
Step 7: Roll everything up, like sushi.
Step 8: Place roll on grill rack.
Step 9: Repeat steps 4-9 with remaining bacon, meat, and cheese.
Step 10: Bake for 25-30 minutes.
Step 11: Brush with BBQ sauce. Bake for another 10-15 minutes.
Step 12: Brush again with BBQ sauce. Bake for another 5 minutes.
Step 13: Remove from oven. Slice each roll into 8 pieces.
Step 14: Serve with additional BBQ sauce and any other condiments (such as pickled jalapeno).

Recipe's time estimate: not listed
My total cooking time: 55 minutes (15 minute prep, 40 minutes cook)

It's hard to tell if the inside of the roll is fully cooked. The cheese was melted and oozing out, so I assumed everything was done. But when I actually sliced everything and started to eat it, I kind of felt like it could have been cooked longer. Nothing looked raw anymore, but I'm not sure about fully cooked....So in the future I'll add on another 5 minutes to the first two cooking stages. I might also invest in a meat thermometer.

But it was still enjoyable. I might try using sliced cheese and creating another "layer" (more like a pinwheel dish), instead of just a center cheese filling. I might also try layering some BBQ sauce too. I think I'll definitely try this again.

Ingredients

Step 3

Step 4

Step 5

Step 6

Step 7

Step 8

Step 11

Step 13

Wednesday, February 11, 2015

Cherry Pie Bites

Let me start this off by saying....THIS IS ONE OF THE BESTEST, EASIEST DESSERTS EVER!! I made this for Tuesday night Magic night (yes, I am a dork). And there were none left by the end of the night. I was supposed to bring treats to work the next day....oops! :) But since they're super easy to make, I can always make more once I run to the store and pick up more pie filling and crescent roll dough. I found the recipe through Pinterest, actual site is here.


Servings: 16
About 151 calories per serving

Ingredients:
1 can Cherry Pie Filling (21 oz)
2 tubes crescent roll
3/4 cup powdered sugar
2 tbsp milk**

*I used Reduced Fat, which has 8 rolls in each tube
**I used my sweet cream creamer since I didn't have milk...still turned out scrumptious!

Step 1: Preheat oven to 375 degrees.
Step 2: Spray muffin tin with nonstick spray (make sure you spread the nonstick in around the tin's cups, I used a napkin). I needed two muffin tins.
Step 3: Put individual crescent rolls into each muffin tin, putting the widest part in the cup.
Step 4: Scoop pie filling into each roll in the tins. Use up filling as evenly as possibly between all rolls.
Step 5: Fold in the dough of each mini pie, starting with the shortest sides (gaps are fine, take a look at the picture below).
Step 6: Bake 13-15 minutes. Rolls will be golden brown on top.
Step 7: Remove from oven; option to put on cooling rack lined with wax paper.
Step 8: Prep icing/glaze - Mix sugar and milk in bowl until smooth. Add small bits of milk if too thick or small bits of sugar if too thin, until desired consistency.
Step 9: Drizzle icing over bites.
Step 10: EAT

Recipe's time estimate: not listed
My total cooking time: 24 minutes (10 minute prep, 14 minutes cook)

My prep time was probably slightly longer than it should have been, since I was taking pictures. I think I can cut it down to closer 5 minutes. Can also prep the icing right at the end of the oven time, instead of after bites are removed. I ate some fresh out of the oven after icing was applied. OMG, was it good. Will definitely be trying this with different pie fillings.

Ingredients

Step 3

Step 4

Step 5

Step 7


Friday, January 30, 2015

Chewy PB2 Cookies

I've been craving peanut butter lately. I mean....who doesn't love peanut butter?! (I did find out that one of the students at work doesn't.....I vocally judged her....). But usually things with peanut butter are pretty high in calories. But a while ago, I discovered PB2 powdered peanut butter, and I love it. I usually mix it which chocolate protein powder, almond milk, and ice for a awesome protein smoothie (and sometimes add banana); this is super similar in taste to Jamba Juice's Peanut Butter Moo'd, and so much cheaper. But I wanted to find more uses for this awesome peanut powder than smoothies. So I searched Pinterest and found this amazing looking cookie. Click here to see the original recipe.

I admit, I easily weighed out the ounces for the recipe using my kitchen scale...but when trying to plug in the ingredients to Lose It....that was more a pain. I Googled conversions! So the conversions I got are below.


Servings: 35 cookies
About 50-60 calories per serving

Ingredients:
1/2 cup sugar (white, granulated)
1/2 cup packed brown sugar (~3.5 oz)
1 egg
1 tsp vanilla extract
1 tsp baking soda
1/2 tsp salt
3 tsp molasses*
1/4 cup + 2 tbsp water
1 cup PB2**
1 1/2 cup whole wheat floor

*The original recipe calls for corn syrup...which I did not have. I substituted molasses. This also required slightly extra water.
**For those of you unfamiliar with PB2, you can find it on Amazon.

Step 1: Preheat oven to 350 degrees.
Step 2: Line 2 baking sheets with parchment paper (I used my silicone baking sheets and they worked fine).
Step 3: Mix together sugars, egg, vanilla, baking soda, salt, molasses, water and PB2. Beat until smooth.
Step 4: Add flour gradually, beating until mixture is well combined. Add extra water as needed to ensure dough is moist (in 1 tbsp increments). Dough will be very sticky.
Step 5: Drop tablespoon-sized balls onto prepped baking sheets.
Step 6: Press top of each cookie with a fork to make parallel lines; flattening cookies to about 1/3 to 1/2 inch thick. (I discovered that the dough stuck to the fork, ruining the cookie shape. But dipping the fork into water between ever 2-3 cookies worked wonders...no more sticking!)
Step 7: Bake cookies for 10-15 minutes, reversing pans midway through (top to bottom, bottom to top).
Step 8: Once cool, store in airtight container.

Recipe's time estimate: 25 minutes (15 minutes prep, 10 minutes cook)
My total cooking time: 55 minutes (40 minute prep, 15 minutes cook)

These were amazing, especially for being only 50-60 calories a piece. They kind of remind me of peanut butter protein bars, but I love those so I see no problem. I was quite a bit slower on the prep time, as the dough is tough to hand-mix since it's so sticky (I sadly do not yet have a stand mixer). Will definitely be making these again!!

Ingredients
Step 3

Step 4

Step 5
Step 6