Cookery [kook-uh-ree] - the art or practice of cooking; a place equipped for cooking.

Showing posts with label Cake. Show all posts

Monday, March 21, 2016

Irish Cream-Chocolate Cake with Irish Whipped Cream

We have people over almost every Saturday for Magic the Gathering (a trading card game), and typically order pizza for dinner. Well, for St. Patty's Day, I wanted to do a themed night more friends might attend, so we had a general "board game" night and potluck for themed dishes! As you may already have realized...I LOVE baking! So I wanted to find a delicious cake recipe that held to the "Irish" theme. And found this one on Pinterest!

When it came time to actually baking it....I couldn't find my regular smaller cake pans for doing a layered cake. So I used my larger springform cake, which still turned out delicious, but I ended up with a LOT of whipped cream for the outside of the cake, since I couldn't do a layer filler (unless I sliced the cake in half). My whipped cream also didn't seem as thick as in the recipe's pictures, so I could have probably added more sugar. But still yummy! ^^

Original recipe here


Servings: 12
Calories per serving: 543

Cake Ingredients:
2 cups all-purpose flour
1 3/4 cups granulated sugar
3/4 cup baking cocoa, unsweetened
1/2 teaspoon salt
1 tablespoon baking soda
1 large egg
2/3 cup oil
3/4 cup buttermilk
1/4 cup Irish Cream liquor*
1 cup black coffee

Frosting Ingredients:
1 pint heavy whipping cream
2/3 cup confectioners' sugar
1/4 cup Irish Cream liquor
1/2 cup chopped milk chocolate (optional)

Cake:
Step 1: Preheat oven to 350°F.
Step 2: Grease springform cake pan.
Step 3: Beat the egg, oil, buttermilk, Irish Cream liquor, and coffee together.
Step 4: Mix dry ingredients together in separate bowl.
Step 5: Add dry mixture to liquid mixture.
Step 6: Beat for 2-3 minutes.
Step 7: Pour into greased cake pan.
Step 8: Bake for 35-50 minutes, or until a wooden stick comes out clean.**
Step 9: Cool completely. This takes about 3-4 hours, depending on your ambient temperature. My house is usually 66-72 degrees and it took close to 4 hours.

Frosting:
Step 1: Beat all ingredients together until cream holds it's shape (keeps peaks) and is the desired consistency.
Step 2: Frost cake.
Step 3: Sprinkle with chopped chocolate, if desired.

*I did not have Bailey's, but had another brand of Irish Cream liquor. I don't think it really matters. Also couldn't really taste it in the chocolate cake, so this might be unnecessary (or maybe just needs more?).

**Original recipe says to bake for 25-30 minutes, but since I was using a larger cake pan, I kept adding on time until a wooden chopstick came out clean. It ended up being about 48 minutes (but if you don't keep opening the oven like I did, your time should be shorter).

As a note, I typically do not sift anything even when a recipe calls for it. Because I'm lazy. It still turned out good without sifting. :)

Recipe time: Prep = 20 minutes, Cooking = 25 mintes. Cooling not estimated.
My cooking time: Prep = 30 minutes, Cooking = 48 minutes, 3-4 hours cooling.

The cake turned out delicious! I can definitely see where it'd be good to have a filling layer, because the cake is pretty dense. But still soooooo good! I piled on the whipped cream, so it was a bit much for some people (but not for me ^^), but everyone who had some enjoyed it. Some of us even had two pieces by the end of the night...... All-in-all, very good recipe!

Cake Ingredients
Cake - Step 3
Cake - Step 4
Cake - Step 6
Cake - Step 7
Cake - Step 8
Frosting Ingredients (plus cake)
Frosting - before mixing
Frosting - after mixing


Sliced cake (some of the whipped cream is drooping down in the middle)

Wednesday, March 9, 2016

Moist Pumpkin Bundt Cake

So I've already failed at trying to post a new recipe once per week..... byebye New Year's Resolutions lol. Maybe I'll change it to at least once a month? Anyways.... I (we) got a bundt cake pan as a wedding gift, and I was super excited to use it over the holidays. And I LOVE pumpkin desserts, especially baked goods! Found what turned out to be a SUPER AWESOME recipe on Pinterest. ^^ I made it three or four times between Thanksgiving and Christmas. So delicious! And surprisingly easy to make. I was a little nervous since I've never made bundt cakes before.

Original recipe here


Servings: 24*
Calories per serving: 206

*24 slices worked out perfectly with my bundt pan. Some shapes/designs may not cut as easily into 24 servings.

Ingredients:
2 1/2 cups white granulated sugar
1 cup canola oil
3 large eggs
3 cups all-purpose flour
2 tsp baking soda
1 tsp ground cinnamon
1 tsp ground nutmeg
1/2 tsp salt
1/4 tsp ground cloves
1 can (15 ounces) pumpkin
Confectioners' (powdered) sugar, for dusting

Step 1: Preheat oven to 350°.
Step 2: Grease bundt cake pan with either butter or spray Pam. Do not use liquid oil, it beads and pools in the pan, rather than evenly greasing it. I made this mistake my first attempt.
Step 3: Dust greased pan with flour.
Step 4: In a large bowl, combine sugar and oil until blended.
Step 5: Add eggs, one at a time, beating well after each addition.
Step 6: Combine flour, baking soda, cinnamon, nutmeg, salt and cloves in separate bowl.
Step 7: Add flour mixture to egg mixture alternately with pumpkin, mixing well after each addition.
Step 8: Transfer batter to greased & floured pan.
Step 9: Bake 60-65 minutes or until toothpick inserted near the center comes out clean.
Step 10: Cool 10-20 minutes before inverting onto a wire rack. Remove pan and cool completely. Step 11: Once cooled, dust with confectioners' sugar.

Recipe time: Prep = 10 minutes, Baking = 1 hour. Cooling not estimated.
My cooking time: 15 minutes for prep, 1 hour cooking. 3-4 hours cooling.

Everyone liked the cake at the parties I took them too. It was still good after a couple days. I brought some to my coworkers after the weekend, and they enjoyed it. :)

Ingredients
Step 2
Step 5
Step 6
Step 7
Step 8
Step 9
Step 10

Monday, February 15, 2016

Mini Cheesecake with Oreo Cookie Crust

So it's been a while since I've updated this blog. Things got more hectic (and really, I got more lazy) the closer we got to the wedding. But that was all done with in November and now I want to start updating this again! I do cook new recipes fairly regularly, so I'm hoping to have a new recipe to post at least once a week or so. Here's hoping I can stick to the plan! :)

I've posted a mini cheesecake recipe before, but that was more of an ultra-mini (bite-size) cheesecake! I've made mini cheesecakes that are 2-3 bites (or could still be one bite if you want), with both original Nilla wafer crust and Oreo cookie crust. I wanted to make a dessert in honor of the Deadpool movie, since I was seeing it with a group of friends, so I decided to go with Oreo cookie crust this time. This is based off a very simple recipe from Philadelphia (cream cheese company). These are pretty hefty calorie-wise, but I didn't make any modifications to try and cut calories this time.

Original recipe here


Servings: 12
Calories per serving: 229

Ingredients:
2 pkg (8 oz each) Philadephia cream cheese, softened
1/2 cup sugar (white, granulated)
1/2 tsp vanilla extract
2 large eggs
12 Oreo cookies (whole, do not crush)
Red food coloring, optional*

Step 1: Heat oven to 350F.
Step 2: Beat cream cheese, sugar and vanilla with mixer until blended.
Step 3: Add eggs (and red food coloring); mix just until blended.
Step 4: Place 1 Oreo cookie in each of 12 paper-lined muffin cups.
Step 5: Top with cream cheese mixture.
Step 6: Bake 20 minutes or until centers are almost set.
Step 7: Cool completely, then refrigerate at least 3 hours or overnight.

Recipe time: 4 hours 10 minutes
My cooking time: 40 minutes for prep and cooking; I left my cheesecakes in the fridge overnight.

*Food coloring is optional. I made them red to go with the Deadpool theme (red and black). I added a lot of red food coloring, and it still turned out more pink than red. I don't usually dye my food, so have not perfected getting the right colors.

This recipe is super easy and has few ingredients. I still need to perfect getting the cheesecakes more flat after cooling (mine were inflated like muffins immediately after baking, then had a pretty sunken center after cooling and refridgerating). But they still taste delicious! They were a hit! And it's definitely hard to have just one...... <( ^^ )>

Ingredients
Step 2

Step 3
Step 4
Step 5

Saturday, March 7, 2015

Baked Nian Gao with Coconut Milk

Chinese New Year just passed. And I was sad to miss my family party AND new year's cake! So I decided to make my own! A couple years ago I made a Baked Nian Gao cake, and although I liked it, it wasn't too popular. So I hunted down a different recipe. And this one turned out sooooooooooo GOOD! Rather addicting. One of my favorite recipes now!

Original recipe here


Servings: 24
About 181 calories per serving

Ingredients:
3 cups of glutinous rice flour
1 cup canned coconut milk
2 cups water
2 cups sugar
1/4 cup butter, melted
4 eggs
2 tsp salt

Step 1: Line a 8 x 8 inch square tin with parchment paper.
Step 2: Pre-heat oven to 350F.
Step 3: Mix butter, coconut milk, sugar, salt and water in large bowl, until sugar is dissolved.
Step 4: Add eggs. Mix well.
Step 5: Add glutinous rice flour. Stir until well combined.
Step 6: Strain mixture into baking tin (I used a mesh rinse/drain bowl, like that used for washing veggies or draining pasta).
Step 7: Bake in the oven 45-90 minutes or until the cake is set. Cool completely for at least one hour before transfer out for cutting into desired size.*

Recipe's time estimate: not listed
My total cooking time: 2 hours (30 minute prep, 1 hour 30 minutes cook)
Does not include cooling time or overnight setting.

*I waited at least two hours before cutting, the cake was still pretty warm despite being on a cooling rack. And the cake was still pretty gooey. It tasted good, but the consistency was off a little. However, after the leftovers sat overnight, the consistency was PERFECT (a little more solid). So it would be best to make this the day before OR at least several hours before serving.

Also, the original recipe cook time was 30-45 minutes. When I checked the cake at 45 minutes, it was still pretty liquidy and not set. I kept adding 10-15 minutes to the cooking time. I probably left it in longer than I had to, but I wanted to be sure it was fully cooked, and the top wasn't burning so I felt it was safe to leave in longer. I ended up leaving it in for almost 1.5 hours.

I took the leftovers to work the next day, and everyone loved it. Many asked for seconds!! And it took all my will power to hand it all away so I wouldn't sit there and snack on it. So I will definitely be making this again. But I might use a larger baking tin or maybe try a higher cooking temp, to try and speed up the cook time.

Ingredients

Step 1

Step 4 

Step 5

Step 7 - completed cake before cutting

Sunday, October 24, 2010

Pumpkin Swirl Cheesecake

I love fall and winter because of all the yummy pumpkin recipes there are to make!! This is one I found last year on Yahoo! Food (they have since taken the link down), and I've made it several times since and everyone how's tried it has loved it!! It's delicious and is relatively easy, aside from the crushing of the gingersnaps.


Ingredients:
25 ginger snap cookies (Nabisco), finely crushed
1/2 cup pecans, finely chopped
1/4 cup butter, melted
4 (8 oz) pkgs cream cheese, softened
1 cup sugar, divided
1 tsp vanilla
4 eggs
1 cup canned pumpkin
1 tsp ground cinnamon
1/4 tsp ground nutmeg
1/8 tsp ground cloves

Recipe makes 16 servings/slices
Weight Watchers points: 9 points per serving

Step 1: Preheat oven to 325F.
Step 2: Mix ginger snap crumbs, pecans, and butter until crumbs and pecans are completely moistened.
Step 3: Press crumb mixture firmly onto bottom of 9-inch springform pan.
Step 4: Beat cream cheese, 3/4 cup of the sugar, and the vanilla with electric mixer until well blended [I hand mixed and it works fine, but does take longer and more energy]
Step 5: Add eggs, one at a time, mixing on low speed after each additional just until blended.
Step 6: Remove 1 1/2 cups of the batter and place in small bowl; set aside.
Step 7: Stir remaining 1/4 cup sugar, pumpkin, and spices into remaining batter.
Step 8: Spoon half the pumpkin batter on top of crust. Top with spoonfuls of half of the reserved plain batter.
Step 9: Repeat layers.
Step 10: Cut through batter with a knife several times for marble effect.
Step 11: Bake 55 min to 1 hour 15 minutes, or until center is almost set. Cool completely.
Step 12: Refrigerate at least 4 hours, or overnight.

Recipe's times:
Prep: 20 minutes
Cook time: 55 minutes
My times:
Prep: 1 hour

Cook time: 1 hour 15 minutes

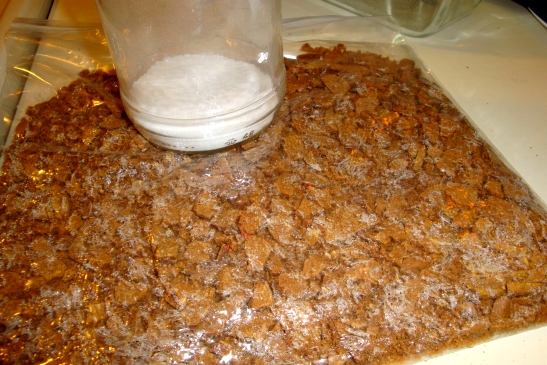
My prep time includes crushing of the gingersnaps. Because they're such hard cookies, it does take a while, and destroys the bag I use while crushing. But it make a delicious crust!!

Ingredients
Crushing ginger snaps


Step 2
Step 3


Step 5
Step 7


Step 8 A
Step 8 B


Step 9 A
Step 9 B


Step 10
Right out of the oven

Tuesday, September 28, 2010

Baked Nian Gao

Nian Gao is also known as Chinese New Year cake. Although Chinese New Year is still quite a ways away, I've been wanting to try this recipe out for a while, and since I had all of the ingredients....here it is! Nian Gao is usually steamed, and optionally pan-fried afterwards. I've never heard of baked nian gao before, but there's a first time for everything, and this recipe looked quick and easy. I've always loved traditional plain Nian Gao, although it is frequently made with azuki (red) beans...which I'm not very fond of. I found this recipe at About.com; Baked Nian Gao.


Ingredients:
16 oz (1 box) Mochiko rice flour, plus a little extra for sprinkling on pan
1 stick (8 tbsp) of butter or 3/4 vegetable oil [I used butter]
3 eggs
2 1/2 cups milk [reviews said the recipe tended to be liquidy, so I used 2 cups]
1 to 1 3/4 cups sugar (depending on how sweet you want it)
1 tbsp baking soda
1 can red azuki beans [which I did not use]

Step 1: Preheat oven to 350F. Lightly grease 9 x 13 inch baking dish, and sprinkle flour over it.
Step 2: Mix all ingredients with an electric mixer for about 2 minutes [or hand mix with whisk until consistent throughout]
Step 3: Pour mixture into baking dish. **
**If using azuki beans, pour 1/2 flour mixture into dish, layer beans on top, then pour rest of mixture
Step 4: Bake 40-50 minutes, or until chopstick comes out clean.

Recipe cook times:
Prep: 5 minutes
Cook: 50 minutes
My cooking times:
Prep: 5 minutes
Cook: 40 minutes

I think it turned out okay, for the first time. I definitely overcooked it (it's slightly burnt), and I had it in for 40 minutes...but I made the grave mistake of not checking on it near the end. It definitely tastes good!!! It's kind of the consistency of cake, but a little stickier like mochi. I love it!!! I used only 1 cup of sugar, so it could be a little sweeter, but it's also fine the way it is. Next time I make this, I'll be sure to check it at 30 minutes; the cook time might be off because I didn't use beans.

Sunday, September 26, 2010

Pineapple Upside-Down Cake

Dan has told me in the past that this is one of his favorite cakes. I must admit, I've never had it before...and it goes without saying I've never made it (or anything like it) before. But I shall boldy go where...I have never gone before... I tweaked a recipe I found in my Baking: A Commonsense Guide cookbook since I don't have a ring tin, so the recipe below is my version of the Pineapple Upside-Down Cake. It turned out pretty tasty, if a little on the dry side. Enjoy!!


Ingredients:
1 tbsp unsalted butter, melted
2 tbsp firmly packed brown sugar
1 can (at least 1 lb) pineapple rings in natural juice
4 oz (8 tbsp) unsalted butter, softened
3/4 cup granulated sugar
3 eggs
1 1/2 tsp vanilla extract
1 1/2 cup all-purpose flour
3 tsp baking powder

Step 1: Preheat oven to 350F.
Step 2: Lightly grease 8-inch round cake pan.
Step 3: Pour melted butter into base of the pan and tip to coat evenly.
Step 4: Sprinkle bottom of pan with brown sugar.
Step 5: Drain pineapple, reserving 1/2 cup of the juice.
Step 6: Cut the pineapple rings in half, arrange on the base (put one whole ring in the center).
Step 7: Beat the softened butter and sugar until creamy.
Step 8: Add eggs individually, beating well after each addition.
Step 9: Add vanilla extract, beat until combined.
Step 10: Fold in flour and reserved pineapple juice, alternating.
Step 11: Spoon mixture evenly over the pineapple and smooth surface.
Step 12: Baker for 35-45 minutes, or until a skewer comes out clean when inserted in the center.
Step 13: Leave in pan for 10 minutes, then turn out onto a wire rack to cool.

Cookbook times:  Prep: 20+ minutes, Cooking: 40 minutes
My cooking times:
Prep: 35 minutes
Cook/baking: 45 minutes + 10 minutes cooling
TOTAL TIME: 1.5 hours


Ingredients (minus eggs)

Step 6

Monday, September 6, 2010

Jessica's German Chocolate Cake

Yes....again with the German Chocolate Cake. Since there were some points to the last one that I didn't like (namely the runny frosting), I decided to combine a couple different recipes, thereby making my own!! MWAHAHAH! Ok...well, first off, this is quite a bit simpler than the other one (although not completely made from scratch...). Secondly, two thumbs up for the frosting, if I do say so myself.


Ingredients:
~Cake~
Betty Crocker's German Chocolate cake mix
~Filling~
2 egg yolks
3/4 cup sugar
3/4 cup evaporated milk
3 tbsp unsalted butter
1 cup shredded unsweetend coconut [I yet again had to use sweetened]
1 cup chopped pecans
1 tsp vanilla extract
~Frosting~
1 (8 oz) pkg cream cheese
1/3 cup confectioner's sugar
1/4 cup heavy whipping cream
1 cup semisweet chocolate chips

Cake
Step 1: Make cake according to package directions. If using two round cake pans, grease pan and put parchment paper on bottom of pans (this makes it a lot easier to remove the cake). I did this using two 8-inch round cake pans.
Step 2: While cake batter is baking, prepare filling and frosting.
Step 3: Let cake cool completely before assembly.

Filling
Step 1: Whisk together egg yolks and sugar.
Step 2: Whisk in evaporated milk, then butter.
Step 3: Cook over low to medium heat in medium saucepan, stirring constantly until the mixture thickens and lightly coats spoon (about 10 minutes). Do not let mixture boil. [If it bubbles slightly, it's OK]
Step 4: Remove from heat and stir in coconut, pecans, and vanilla.
Step 5: Transfer to a bowl and let cool completely.

Frosting
Step 1: Using microwave (or double boiler) melt chocolate.
Step 2: Add heavy cream; mix until smooth. Remove from heat, if using stove.
Step 3: In separate bowl, cream together sugar and cream cheese until smooth.
Step 4: Slowly add chocolate mixture. Mixture will thicken as it cools.

Assembly
Step 1: Place one cake on serving plate.
Step 2: Using half the filling (or appropriate amount depending on how many layers you have), spread on cake.
Step 3: Place second cake on top of filling.
Step 4: Spread rest of filling on top of cake.
Step 5: Spread frosting on sides of cake [don't be shy, you'll have plenty of frosting].
Step 6: Using a piping bag or decorator, use rest of frosting to put rosettes or decorative border on cake. Use any extra frosting along base of cake (rosettes, etc.)

Store cake in refrigerator.

Total cook time (not including cooling period): 1 hour 20 minutes

Not bad. A lot less involved, and it took a lot less time all together. And it was fantastic!! I love cream cheese frosting. ^^

Ingredients
Cake: Step 1

Filling: Step 3

Filling: Step 5


Frosting: Step 2

Frosting: Step 4


Assembly: Step 2

Assembly: Step 4